


Results 1 to 1 of 1
-
26th May 2012, 01:54 PM#1


 OPMember
 [Photoshop] - Create a Colorful Light Burst with Text

Step 1: Open A New Photoshop Document with the size: 640px X 340px.

Step 2: Add your Text making sure the Text is set to Black

Step 3: Rasterize the Text Layer by Right clicking on the layer and clicking on 'Rasterize Layer'.

Step 4: Add a Selection aroun the Text Layer by Ctrl+Click on the Preview Box of the Layer.

Step 5: Once you have selected the layer, go upto the select menu and press 'Save Selection', do not give it a name yet. Press Ok.

Step 6: Select your text layer, go onto the Edit Menu and choose Fill. When the Box Appears, Keep the Contents to White but change the Blending Mode to Multiply.

Step 7: Then click on the Filter Menu, and choos eBlur, and then Gaussian Blur. When the Box appears set the radius to 4.0 Pixels. Press Ok.

Step 8: Still with the Text Layer Selected, click on the Filter Menu and choose Stylize and choose Solarize. The document will turn Black and your text will appear a white stroke.

Step 9: Next, press CTRL+L to bring the the Brightness tool up. Move the white arrow to the end of the diagram as show below.

Step 10: Duplicate the Text Layer, By Pressing CTRL+J.

Step 11: Make sure the Copy is now Selected and Press the Filter Menu and Choose Distort and then Polar Coordinates. When the box appears make sure the 'Polar to Rectangular' Radio button is selected. Press Ok.
http://www.photoshopessentials.com/i...oordinates.jpg
Step 12: Go on to the Image Menu and select Rotate Canvas, and choose 90 CW.

Step 13: Then Click CTRL+I to invert the image to black becomes white etc.

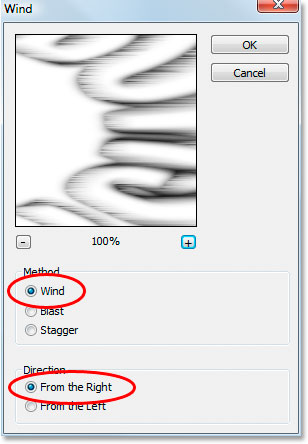
Step 14: Then Click on the Filter Menu, Stylize and then Wind. When the box appears make sure it says 'From the Right'. Press Ok. Then Press CTRL+F three times.
Step 15: Invert the Image again by clicking CTRL+I.

Step 16: With the Image still inverted apply the wind filter three more time by pressing CTRL+F three times.

Step 17: Now we need to brighten the image, press SHIFT+CTRL+L. This will brighten the colors automatically.

Step 18: rotate the canvas 90 degrees anticlockwise, by clicking on the image menu, rotate canvas and click on rotate 90 CCW.

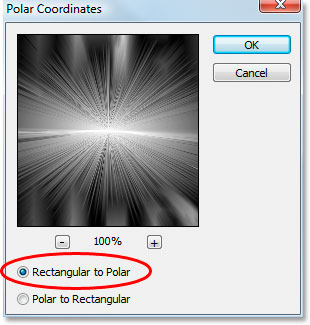
Step 19: Now click on the Filter Menu, Distort, Polar Coordinates. This time choose 'Rectangular to Polar'. press Ok.
Step 20: Making sure the Copy of the Text is still selected click on the Layer Mode above the Layer 'Normal' and change it to 'Screen'.

Step 21: Click on the New Fill Layer icon at the bottom of the layer pallette. Click on Gradient.

Step 22: Make Sure the Black to White Gradient is selected and then change the colors to two colors of your choice, I used a redy orange and a yellowy orange.

Step 23: Change the Blend Mode to Color from Normal above the Layer Palette.

Another Tutorial Soon ,
,
Regards,
PythonGFXPythonGFX Reviewed by PythonGFX on . [Photoshop] - Create a Colorful Light Burst with Text https://sportscheme.co.uk/images/light.png Step 1: Open A New Photoshop Document with the size: 640px X 340px. http://www.photoshopessentials.com/images/type/effects/light-burst/new-document.jpg Step 2: Add your Text making sure the Text is set to Black http://www.photoshopessentials.com/images/type/effects/light-burst/enter-text.jpg Step 3: Rasterize the Text Layer by Right clicking on the layer and clicking on 'Rasterize Layer'. Rating: 5

 Register To Reply
Sponsored Links
Thread Information
Users Browsing this Thread
There are currently 1 users browsing this thread. (0 members and 1 guests)
Similar Threads
-
[Photoshop] - Create an Electric Text Effect
By PythonGFX in forum Tutorials and GuidesReplies: 13Last Post: 15th Jun 2012, 03:02 PM -
Need Photoshop 7 fonts to create logos
By saini in forum Graphics AreaReplies: 6Last Post: 25th Dec 2011, 10:36 AM -
[TUT][Photoshop]How to Create a Forum Skin
By Mind Freak in forum Graphics AreaReplies: 22Last Post: 6th Sep 2010, 06:53 PM -
[TUT][Photoshop]Create A Wallpaper in less than 5 mins
By Mind Freak in forum Graphics AreaReplies: 5Last Post: 14th Aug 2010, 11:40 AM -
[TuT][Photoshop]Simple 3D Text
By Mind Freak in forum Graphics AreaReplies: 7Last Post: 13th Aug 2010, 10:36 PM


 Staff Online
themaLeecher - leech and manage...
Version 4.83 released. Open older version (or...