


Results 1 to 6 of 6
-
10th Sep 2009, 05:22 AM#1


 OPMember
 [TUT] How to Add a New Skin to vBulletin
Today I am going to show you how to add a new skin to vBulletin. This is really easy to do and doesn't take more then 5 mins. Now there are different ways of doing this but this is a simple way to do it.
First off their are two ways of doing this, one would be to upload the style files via your cPanel or you can use an FTP. Either way is fine but I prefer using an FTP as its easy and faster. There will be one step where you will need to upload a .xml file to from your AdminCP but that applies to both ways.
What you will need:
- A compatible vBulletin skin (e.g if you are using vBulletin v3.8.2 you need a skin that is compatible for that version)
- A FTP (Google FileZilla for a free FTP)
- Access to vBulletin AdminCP
For this tutorial I am going to use the Crystal Clean style by CompletevB as an example. Ok lets get started.
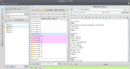
1st. When you download a vBulletin skin you will get several files, here is a picture as an example:

Notice the file named vbulletin-style, this is the file your are going to upload via your AdminCP. The images folder you are going to upload via your FTP. The rest of the files you see like the folder that says headerfiles, that folder contains the files used for the creation of the header, you can use these files to customize your own header to fit your liking. The avatar on navbar is usually a plug in used to display a message to a member when he or she usually doesn't have a personal avatar. I will not go into this at the moment as the skin should come with a readme file on how to install this.
2nd. Login to your AdminCP, once there Styles and Templates - Download / Upload Styles. Once there, navigate to the Import Style XML File section, now find the "browse" button and click on it, once there find the .xml file of the skin that you wont to upload, select it and click open, here is a picture to guide you:

Once you got the .xml file selected, click on the Import button in the "Import Style XML File" section of the AdminCP. The file should now stored and you are ready to import the images to the skin.
***If for some reason you get a notice saying the version of the skin is not compatible with the current version of your vBulletin you have to go back and import the file again but make sure you select yes in the "Ignore Style Version" section this time, here is a picture to guide you:

Now you should have successfully imported the .xml file.
3rd. This is the part where your FTP kicks in. Log in to your FTP account using Filezilla (or your preferred FTP client), make sure you enter all your details including the user name and password provided by your host or you won't log in successfully. Now locate the public_HTML folder (should be on the "Remote Site" section on your FTP) and open it. Now within the folder locate the folder where you installed vBulletin and open it. Now located a folder called Images within the vBulletin folder and open it as well. In that folder is where you are going to put the images folder that came with your vBulletin skin. For your convenience I would rename that folder to the name of you vBulletin skin, for instance, my images folder would now be renamed to Crystal Clean. Now drag and drop your renamed folder into the Images folder that is within your vBulletin folder, here is a picture to guide you:

This should take around 2-4 mins to import so be patient. Once that has finished, you can check to see if the skin successfully installed.
Skin successfully installed! Hope you enjoyed this tutorial, it may have been lengthy but now that you know how to do it it shouldn't take you that long to install it

Flash Reviewed by Flash on . [TUT] How to Add a New Skin to vBulletin Today I am going to show you how to add a new skin to vBulletin. This is really easy to do and doesn't take more then 5 mins. Now there are different ways of doing this but this is a simple way to do it. First off their are two ways of doing this, one would be to upload the style files via your cPanel or you can use an FTP. Either way is fine but I prefer using an FTP as its easy and faster. There will be one step where you will need to upload a .xml file to from your AdminCP but that Rating: 5
-
10th Sep 2009, 05:24 AM#2
MemberWebsite's:
forumflare.comGood tutorial.
Useful to those people who are just learning.
PS: You should Watermark your pictures, this tut might get posted in some other places without giving you credit.

-
10th Sep 2009, 05:29 AM#3
Member
Great tut for noobs
Watermark your images, exel has a good idea.
-
10th Sep 2009, 05:41 AM#4
OPMember
Thanks, updated with water marks

-
10th Sep 2009, 05:44 AM#5
Member
Nice Tutorial..
Good that you watermarked.Coding Horror Fan
I don't read PM's frequently .
-
10th Sep 2009, 12:48 PM#6
good one bro keeps up

 Register To Reply
Sponsored Links
Thread Information
Users Browsing this Thread
There are currently 1 users browsing this thread. (0 members and 1 guests)
Similar Threads
-
[Selling] Selling vBulletin Skins | $20 Flat/Skin | 3 copies/Skin |
By Skords in forum Completed TransactionsReplies: 8Last Post: 24th Oct 2010, 01:46 PM -
[Selling] Vbulletin Premium Skin - 10$ Only (Cheapest Skin) And Best Ever Sold in KWWH
By gameexpert in forum Completed TransactionsReplies: 12Last Post: 27th Aug 2010, 05:27 PM -
[Selling] Vbulletin Premium Skin - 10$ Only (Cheapest Skin)
By gameexpert in forum Completed TransactionsReplies: 5Last Post: 27th Aug 2010, 04:24 PM -
[Selling] Taffed Skin vBulletin Skin
By Baraka in forum Completed TransactionsReplies: 23Last Post: 30th Jun 2010, 12:16 AM -
Free vBulletin Skin to WCDDL Skin Converstion* Limited Offer
By Plutost in forum Webmaster DiscussionReplies: 6Last Post: 2nd Jun 2009, 12:59 PM


 Staff Online
themaPoster - post to forums and...
Version 5.38 released. Open older version (or...